Unveiling the True Value of Shell Shards in Hollow Knight: Silksong: Essential Uses and Capacity Upgrades
As the vibrant and perilous realm of Pharloom unfolds before you in Hollow Knight: Silksong, you’ll inevitably find yourself accumulating Shell Shards. These peculiar items, often dropped by the vanquished denizens of this new world, represent a distinct form of currency, and at a glance, they might appear overshadowed by the more ostentatious allure of Rosaries. However, to dismiss Shell Shards as mere trinkets would be a grave miscalculation. Their utility is profound, and understanding their purpose is paramount to a truly comprehensive and successful exploration of Silksong. While the game itself might not immediately elucidate their significance, we at Gaming News have delved deep into the mechanics of Pharloom to uncover the essential roles these Shell Shards play. Prepare to discover how these seemingly unassuming fragments can drastically enhance your journey, from quest completion to the very upkeep of your vital tools.
What Are Shell Shards Used For in Hollow Knight: Silksong? The Dual Pillars of Progression
The initial impression of Shell Shards as a lesser currency, secondary to Rosaries which are vital for purchasing maps from Shakra and unlocking resting points like benches, is understandable but ultimately misleading. Shell Shards are not simply a supplementary form of payment. Instead, they serve two critical and distinct functions that directly impact your progression and your ability to overcome the challenges that Pharloom presents.
Fulfilling Quests on Bone Bottom’s Wishwall: Nurturing the Pilgrim’s Haven
The first, and perhaps most immediately impactful, use for Shell Shards lies within the enigmatic Wishwall located in Bone Bottom. This unique location acts as a hub for the aspirations and desires of the pilgrims who inhabit Pharloom. Here, you will encounter various quests that explicitly request a specific quantity of Shell Shards as a form of donation or contribution.
Completing these Wishwall quests is not merely a matter of ticking a box; it has tangible effects on the world around you. Each successful donation of Shell Shards contributes to the revitalization and enhancement of the pilgrims’ ramshackle settlement. As you contribute, you’ll witness the environment becoming more vibrant, and potentially, new services or interactions may become available as the community flourishes. This aspect highlights a deeper meta-game within Silksong, where your actions directly influence the development of the game’s NPCs and their settlements, offering a sense of communal progression that complements your personal journey. Imagine the satisfaction of seeing the Bone Bottom settlement grow and prosper, all thanks to your diligent collection and contribution of these vital Shell Shards. The quests often vary in their requirements, demanding anywhere from a modest handful to a substantial sum, encouraging consistent engagement with the shard-gathering aspect of gameplay.
Maintaining the Forge Daughter’s Ingenious Tools: The Key to Sustained Combat Prowess
The second, and arguably even more crucial, application of Shell Shards is in the upkeep and maintenance of the specialized tools crafted by the enigmatic Forge Daughter. These tools, born from her exceptional craftsmanship and your hard-earned Craftmetal, are instrumental in your combat effectiveness. We have already explored the vital process of locating the Forge Daughter and understanding her crafting capabilities. Now, we delve into the lifecycle of the tools she bestows upon you.
You may notice that after acquiring impressive tools like the String Shard, which are purchased with a significant investment of Rosaries and Craftmetal, they possess a finite number of uses. This limitation can be a frustrating impediment during extended expeditions or challenging boss encounters. This is precisely where Shell Shards demonstrate their indispensable value.
Whenever you choose to rest at a Bench, a fundamental mechanic for healing and resetting the world in Hollow Knight: Silksong, a hidden and automatic process takes place. The game will intelligently assess which of the Forge Daughter’s tools you currently have equipped. Subsequently, it will expend Shell Shards from your inventory to “refuel” or restore the durability of these tools. This means that as long as you possess sufficient Shell Shards, your powerful crafted implements will remain ready for use, ensuring you can consistently leverage their unique advantages without the fear of them breaking at a critical moment. This mechanic elegantly ties together resource management, exploration, and combat, creating a deeply integrated gameplay loop. The more you rely on the Forge Daughter’s creations, the more you will understand and appreciate the constant need for Shell Shards. This system encourages strategic planning, as players must balance their shard collection with their desire for powerful, albeit temporary, combat enhancements.
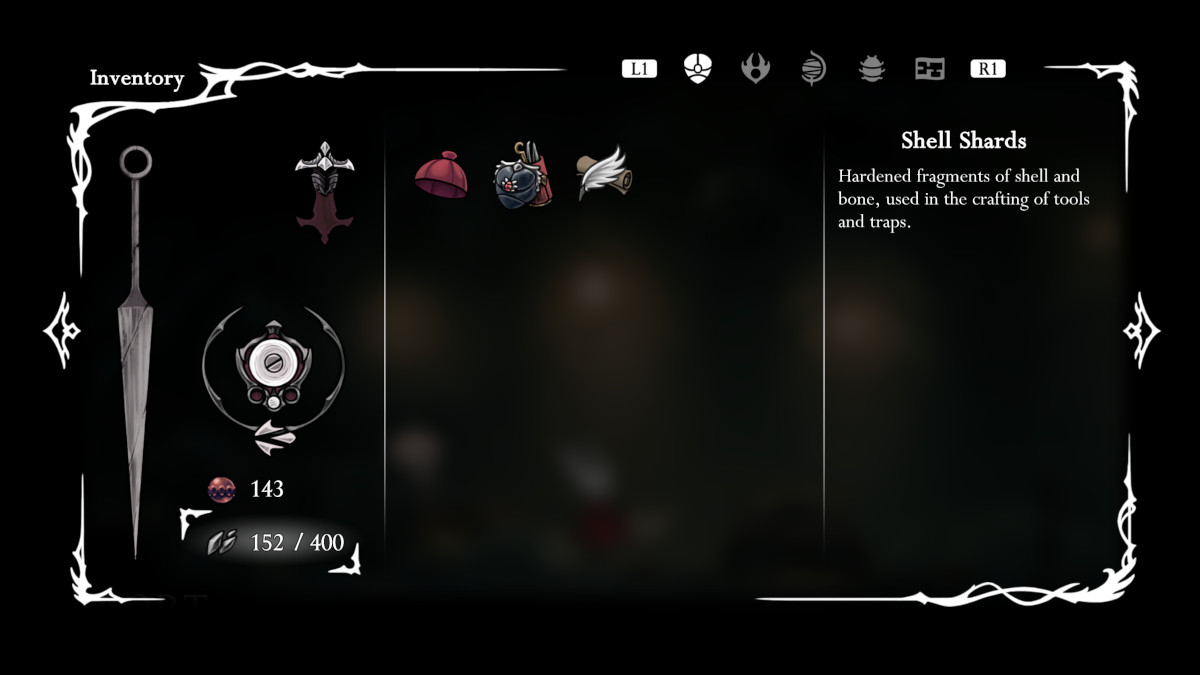
Expanding Your Carrying Capacity: How to Hold More Shell Shards in Hollow Knight: Silksong
At the nascent stages of your adventure in Pharloom, your capacity to hoard Shell Shards is deliberately limited. You will likely find yourself able to carry a maximum of 400 Shell Shards. While this initial limit may seem adequate for early game needs, as you become more invested in the mechanics of tool usage and the benefits of the Wishwall quests, you will undoubtedly discover the desire, and indeed the necessity, to carry a greater quantity. Fortunately, Silksong offers a clear and accessible pathway to significantly increase your Shell Shard carrying capacity.
The Journey to Pilgrim’s Rest and the Acquisition of the Tool Pouch
The key to expanding your Shell Shard limit lies in reaching a specific sanctuary and acquiring a special upgrade. This journey requires a degree of progression through Pharloom, so patience and diligent exploration will be rewarded.
The first prerequisite is to obtain the Drifting Cloak, an essential traversal ability that will unlock new pathways and allow you to access previously unreachable areas. Once you have mastered the Drifting Cloak, you must then overcome the formidable challenge of the Fourth Chorus in the Far Field. This victory signifies a significant milestone in your progress.
Following this triumph, you will need to navigate to a central chamber within the Far Field. Within this chamber, you will find a series of updrafts that are crucial for vertical movement. It is imperative that you utilize these updrafts effectively. Approximately halfway to the apex of the updraft, you must expertly hook off to the right. This precise maneuver will lead you to a hidden location known as Pilgrim’s Rest.
Pilgrim’s Rest is a sanctuary for the pilgrims, offering a safe haven and valuable services. To unlock the doors of Pilgrim’s Rest and gain access to its offerings, you will need to make a one-time payment of 30 Rosaries. This initial investment is well worth it for the benefits it provides.
Once inside Pilgrim’s Rest, you will encounter a merchant named Mort. It is Mort who offers the vital upgrade that directly impacts your Shell Shard capacity: the Tool Pouch. The Tool Pouch can be purchased from Mort for 220 Rosaries. This upgrade is far more than a simple inventory expansion. The Tool Pouch not only allows you to carry a greater number of the Forge Daughter’s tools simultaneously but, crucially, it also expands your maximum carrying capacity for Shell Shards.
It is strongly advised to acquire the Tool Pouch as soon as you are able to access Pilgrim’s Rest. The upgrade provides a substantial increase to your Shell Shard limit, enabling you to gather more, contribute more to Wishwall quests, and ensure your tools are consistently maintained. It’s important to note that the fee to unlock Pilgrim’s Rest itself, the 30 Rosaries, resets each time you depart from the sanctuary. This detail encourages players to be strategic about their visits and make the most of their time within the sanctuary once unlocked. By prioritizing the acquisition of the Tool Pouch, you are investing in your long-term efficiency and capability within the challenging world of Pharloom, ensuring that Shell Shards cease to be a bottleneck and instead become a readily available resource to support your journey. The strategic implications are clear: a higher Shell Shard capacity means more frequent tool refueling, less backtracking to collect more shards, and the ability to tackle more demanding Wishwall quests, all contributing to a smoother and more effective playthrough of Hollow Knight: Silksong.
The intricate interplay between Shell Shards, the Forge Daughter’s tools, the Wishwall, and the Tool Pouch upgrade reveals a meticulously designed economic and progression system within Silksong. These seemingly minor fragments are, in fact, cornerstones of your advancement, empowering you to face the trials of Pharloom with greater confidence and capability. Understanding and mastering the acquisition and use of Shell Shards is not just beneficial; it is an essential element of becoming a truly formidable explorer in this vast and mysterious new world.